Grouting tile is one of those home improvement tasks that can make or break the final appearance of your tiling project. While it might seem intimidating at first, with the right approach and a bit of patience, even beginners can achieve professional-looking results. This comprehensive guide will walk you through every step of the grouting process, helping you transform your tile installation into a polished, finished product.
Understanding Grout: What You Need to Know Before Starting
Before diving into the grouting process, it’s important to understand what grout actually is and why it matters. Grout is a cement-based or epoxy-based material that fills the spaces between tiles, providing structural support and preventing moisture from seeping beneath the surface. Beyond its functional purpose, grout also plays a significant aesthetic role, defining the pattern and emphasizing the beauty of your tile work.
There are several types of grout available, and choosing the right one depends on your specific project. Sanded grout works best for joints wider than 1/8 inch, while unsanded grout is ideal for narrower spaces and delicate tiles that might scratch. For areas exposed to moisture or staining, epoxy grout offers superior protection, though it’s more challenging to work with and comes at a higher price point.
Gathering Your Tools and Materials
Having everything you need within reach makes the grouting process much smoother. Here’s what you’ll need to gather before getting started:
Essential tools include: a rubber grout float, large sponges, buckets for water and mixing, a grout mixing paddle or stick, safety glasses, rubber gloves, and clean towels. You’ll also need your chosen grout, a grout sealer for later application, and possibly a grout bag if you’re working with textured or uneven tiles.
Don’t skimp on quality when it comes to your sponges—invest in proper grout sponges that won’t fall apart or leave residue on your tiles. Having multiple buckets is also crucial: one for clean water and one for rinsing your sponge.
Step-by-Step Grouting Process
Step 1: Prepare Your Surface
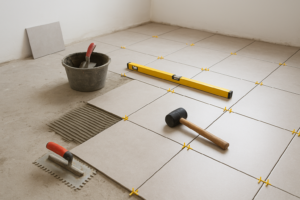
Before applying any grout, ensure your tile adhesive has completely cured—this typically takes at least 24 to 72 hours, depending on the product. Remove all tile spacers and clean the joints thoroughly, eliminating any dust, debris, or dried adhesive. A vacuum works wonderfully for this task, followed by a damp cloth to catch any remaining particles.
Step 2: Mix Your Grout Properly
Follow the manufacturer’s instructions precisely when mixing your grout. Pour the recommended amount of water into your bucket first, then gradually add the grout powder while stirring continuously. Mix until you achieve a smooth, peanut butter-like consistency—not too runny, not too thick. Let the mixture slake (rest) for about 10 minutes, then give it a quick stir before using.
Step 3: Apply the Grout
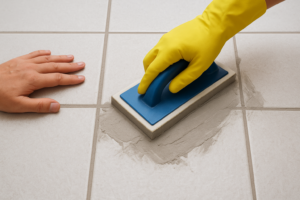
This is where the magic happens. Scoop a generous amount of grout onto your rubber float and hold it at a 45-degree angle to the tile surface. Work diagonally across the tiles, pressing the grout firmly into the joints. Make multiple passes in different directions to ensure the joints are completely filled without air pockets. Don’t worry about getting grout on the tile faces—that’s completely normal and expected.
Step 4: Remove Excess Grout
Once you’ve filled a manageable section (typically 10-25 square feet), hold your float at a steep angle and scrape diagonally across the tiles to remove excess grout. Try to remove as much as possible without pulling grout out of the joints themselves. This step significantly reduces cleanup time later.
Step 5: Initial Cleaning
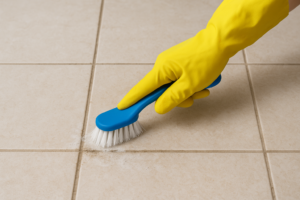
Wait about 15-30 minutes after grouting—the grout should be firm but not completely hardened. Using a damp (not wet) sponge, gently wipe the tiles in a circular motion, rinsing your sponge frequently in clean water. Change your water often to avoid spreading grout residue around. Be careful not to press too hard or you’ll pull grout from the joints.
Step 6: Final Polishing
After the initial cleaning, a hazy film will likely remain on your tiles. Once the grout has dried for a few hours, buff this haze away using a clean, dry cloth. For stubborn residue, a slightly damp microfiber cloth works wonders.
Step 7: Shape and Smooth the Joints
Before the grout fully cures, check your joints for consistency. If needed, gently run a damp sponge or your finger along the joints to create smooth, slightly concave lines. This professional touch makes a significant difference in the final appearance.
Curing and Sealing: The Final Steps
Patience is crucial during the curing phase. Allow your grout to cure for at least 48-72 hours before exposing it to moisture. Keep the area dry and avoid heavy foot traffic during this time. Some grouts benefit from mist curing—lightly misting the grout lines with water several times during the first day helps prevent cracking.
Once fully cured, applying a grout sealer protects your hard work from stains, moisture, and discoloration. Following the sealer manufacturer’s instructions, apply a thin, even coat to the grout lines, wiping away any excess from the tile surface. Reapply sealer annually in high-traffic or high-moisture areas to maintain protection.
Common Mistakes to Avoid
Even with careful preparation, beginners often encounter a few pitfalls. Using too much water during cleanup is perhaps the most common error—this weakens the grout and can cause discoloration or cracking. Similarly, working too large an area at once can result in grout hardening before you finish cleaning, making removal extremely difficult.
Rushing the curing process is another frequent mistake. Exposing freshly grouted tiles to water prematurely can ruin your work and require regrouting. Also, don’t forget to remove tile spacers—it’s surprisingly easy to accidentally grout over them!
Professional Tips for Superior Results
Want to elevate your grouting from good to great? Here are some insider tips that professionals use:
Work in small sections, especially as a beginner. It’s better to go slowly and achieve excellent results than to rush and create problems. Keep your grout lines consistent in depth—they should be slightly recessed below the tile surface, not bulging or too deeply set.
Temperature and humidity matter more than you might think. Ideal grouting conditions are between 50-80°F with moderate humidity. Extreme temperatures can cause grout to dry too quickly or too slowly, affecting its strength and appearance.
Consider the grout color carefully. While white and gray are popular choices, matching your grout to your tile creates a seamless look, while contrasting colors highlight the tile pattern. Test your color choice on a small, inconspicuous area first if possible.
Troubleshooting Common Issues
Despite your best efforts, you might encounter some challenges. If you notice cracking in your grout lines, this often indicates the grout was mixed too thin, dried too quickly, or there’s movement in the substrate. Small cracks can be repaired with matching grout or a grout repair product.
Discoloration or blotchiness usually results from inconsistent water usage during cleanup or incomplete mixing. Prevention is the best cure, but in severe cases, you may need to remove and replace the affected grout.
If grout comes loose or falls out, the joints weren’t properly filled or cleaned before grouting. Remove the loose grout completely, clean the joint thoroughly, and regrout the affected areas.
Comparison Chart: Types of Grout
| Grout Type | Best For | Pros | Cons | Price Range |
|---|---|---|---|---|
| Sanded Grout | Joints wider than 1/8 inch, floor tiles | Strong, affordable, resists shrinking | Can scratch delicate tiles, requires sealing | $ |
| Unsanded Grout | Joints 1/8 inch or narrower, wall tiles, polished stone | Smooth finish, won’t scratch tiles | Can shrink in wide joints, requires sealing | $ |
| Epoxy Grout | High-moisture areas, commercial applications | Stain-proof, waterproof, no sealing needed | Difficult to work with, expensive, limited color options | $$$ |
| Acrylic Grout | Quick projects, beginner-friendly applications | Pre-mixed, easy to apply, flexible | Less durable, not suitable for wet areas | $$ |
Frequently Asked Questions
Q: How long should I wait before grouting after laying tile?
A: Wait at least 24-72 hours after laying tile before grouting, depending on your adhesive type and environmental conditions. Check your tile adhesive manufacturer’s recommendations for specific timing. The adhesive must be completely cured to prevent tiles from shifting during grouting.
Q: Can I grout and tile in the same day?
A: Generally, no. While some rapid-set adhesives allow grouting after just a few hours, most require at least 24 hours of curing time. Grouting too soon can cause tiles to shift or pop loose, ruining your installation.
Q: How do I know if my grout is mixed correctly?
A: Properly mixed grout should have a consistency similar to peanut butter or thick cake frosting. It should hold its shape when scooped but spread smoothly without being runny. If you can see dry powder or the mixture is watery, adjust accordingly.
Q: Why is my grout cracking?
A: Grout cracks for several reasons: mixing with too much water, applying it too thin, inadequate curing time, or movement in the substrate. Very wide joints without proper support can also crack. Using the correct grout type for your joint width helps prevent this issue.
Q: Do I really need to seal my grout?
A: For most cement-based grouts, yes. Sealing protects against stains, moisture penetration, and discoloration. Epoxy grout doesn’t require sealing. In high-moisture areas like showers or high-traffic zones like kitchen floors, sealing is especially important for longevity.
Q: How often should I reseal my grout?
A: In general, reseal grout annually in high-traffic or high-moisture areas, and every 2-3 years in less demanding locations. To test if resealing is needed, sprinkle a few drops of water on the grout—if it absorbs rather than beads up, it’s time to reseal.
Q: Can I change my grout color without regrouting?
A: Yes, grout colorants and stains are available that can change or refresh grout color without complete removal. However, for best results and durability, removing old grout and applying new grout in your desired color is the preferred method.
Q: What’s the difference between grout and caulk?
A: Grout is rigid and used to fill joints between tiles. Caulk is flexible and used where tiles meet other surfaces (like tubs, showers, or walls) that may expand and contract. Always use caulk, not grout, in corners and transition areas.
Q: How do I remove grout haze that won’t come off?
A: For stubborn grout haze, use a specialized grout haze remover (available at hardware stores) following the product instructions. Alternatively, a solution of white vinegar and water can help, though avoid using acidic cleaners on natural stone tiles.
Conclusion
Grouting tile like a professional is absolutely achievable for beginners who take their time and follow proper techniques. Remember that preparation, patience, and attention to detail are your greatest allies in this process. From selecting the right grout type to mixing it correctly, applying it thoroughly, and cleaning meticulously, each step contributes to the overall success of your project.
Don’t be discouraged if your first attempt isn’t perfect—grouting is a skill that improves with practice. Start with a small, less visible area to build your confidence before tackling larger or more prominent spaces. With the knowledge you’ve gained from this guide, you’re well-equipped to achieve beautiful, professional-looking results that will enhance your tile installation for years to come.
The satisfaction of completing a tile grouting project yourself is immense, not to mention the money saved by avoiding professional installation fees. So gather your materials, take your time, and enjoy the process of transforming your tile work into a finished masterpiece.