Let’s face it—dirty grout is one of those household eyesores that can make even the most beautiful tile look shabby. Whether it’s in your bathroom, kitchen, or entryway, grimy grout lines seem to attract dirt like a magnet. But here’s the catch: cleaning grout without damaging your precious tile can feel like walking a tightrope. You want those grout lines sparkling, but not at the expense of scratched, discolored, or etched tiles.
Don’t worry, though. I’ve been there, scrubbing away on my hands and knees, learning the hard way what works and what definitely doesn’t. Today, I’m sharing everything I’ve learned about cleaning grout safely and effectively without turning your tile into a disaster zone.
Understanding Your Enemy: Why Grout Gets So Dirty
Before we dive into cleaning methods, let’s talk about why grout becomes such a dirt magnet. Grout is porous by nature, which means it absorbs spills, dirt, and moisture like a sponge. Over time, this creates those dark, dingy lines that make your floor or walls look neglected—even when you clean regularly.
The type of grout you have matters too. Sanded grout is used for wider joints and has a rougher texture, while unsanded grout is smoother and used for narrower spaces. Both types can get dirty, but sanded grout tends to trap more debris due to its texture.
The Golden Rule: Test First, Clean Second
Here’s my number one rule that has saved me from countless tile mishaps: always test your cleaning solution in an inconspicuous area first. I can’t stress this enough. What works beautifully on one type of tile might completely ruin another. Give your test spot at least 24 hours to reveal any potential damage before you commit to cleaning the entire surface.
Safe and Effective Grout Cleaning Methods
Now for the good stuff—the cleaning methods that actually work without destroying your tile. I’ve ranked these from gentlest to strongest, so start with the mildest option and work your way up if needed.
Method 1: Warm Water and Elbow Grease
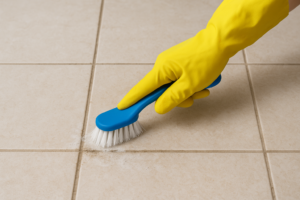
Sometimes the simplest solution is the best one. For light dirt and regular maintenance, warm water with a stiff-bristled brush (not metal!) can work wonders. Scrub in circular motions along the grout lines, rinse with clean water, and dry thoroughly. This method is safe for all tile types and costs absolutely nothing.
Method 2: Baking Soda Paste
When water alone doesn’t cut it, my go-to is a simple baking soda paste. Mix three parts baking soda with one part water until you get a thick consistency. Apply it to the grout lines, let it sit for 10-15 minutes, then scrub with your brush. The gentle abrasiveness of baking soda lifts dirt without scratching most tile surfaces. Rinse thoroughly when you’re done.
Method 3: Vinegar and Baking Soda (With Caution)
The classic combination of vinegar and baking soda creates a fizzing action that can break down stubborn grime. However—and this is important—never use vinegar on natural stone tiles like marble, granite, or travertine. The acidity can etch and dull these surfaces permanently.
For ceramic or porcelain tile, spray white vinegar on the grout after applying baking soda paste. Let it fizz for a few minutes, scrub, and rinse well with water.
Method 4: Hydrogen Peroxide Solution
For tougher stains, hydrogen peroxide is your friend. Mix equal parts hydrogen peroxide (3% concentration) and water in a spray bottle. Spray the grout lines, wait 10 minutes, scrub, and rinse. This method is safe for most tile types and has mild bleaching properties that brighten grout without harsh chemicals.
Method 5: Commercial Grout Cleaners
When all else fails, commercial grout cleaners can tackle the toughest jobs. Look for pH-neutral formulas specifically designed for your tile type. Always follow the manufacturer’s instructions carefully, wear gloves, and ensure good ventilation.
What NOT to Do: Grout Cleaning Mistakes
I’ve made my share of mistakes over the years, so learn from my errors. Avoid these common pitfalls:
Don’t use bleach on colored grout—it will lighten or discolor it. Bleach is also harsh on natural stone and can damage grout over time.
Never use acidic cleaners on natural stone—this includes vinegar, lemon juice, and many commercial cleaners. These will etch the surface permanently.
Skip the steel wool and metal brushes—they’ll scratch tile surfaces and can leave metal particles that rust and stain grout.
Don’t use too much water—especially on wall grout. Excessive moisture can seep behind tiles and cause mold or damage.
Avoid steam cleaners on certain tiles—rapid temperature changes can crack delicate tiles or loosen adhesive.
Tools That Make the Job Easier
Having the right tools makes grout cleaning so much more manageable. Here’s what I keep in my cleaning arsenal:
A stiff nylon brush or old toothbrush for detailed work; a grout brush with an angled handle saves your back on floor tiles; microfiber cloths for wiping and buffing; a spray bottle for applying solutions evenly; and knee pads—trust me, your knees will thank you.
Preventing Future Grout Grime
Once you’ve got your grout looking fresh, you’ll want to keep it that way. Sealing your grout is the single best preventive measure you can take. A good quality grout sealer creates a protective barrier that repels dirt and moisture. Reapply every 6-12 months depending on traffic and exposure to water.
Regular maintenance also goes a long way. Wipe up spills promptly, sweep or vacuum regularly to prevent dirt buildup, and do a quick scrub with warm water monthly to prevent deep-set stains from forming.
When to Call in the Professionals
Sometimes, despite our best efforts, grout is beyond DIY rescue. If your grout is crumbling, has extensive mold that doesn’t respond to cleaning, or is deeply stained after trying multiple methods, it might be time to call professional tile cleaners. They have industrial-strength equipment and specialized products that can restore even the most hopeless-looking grout.
Comparison Chart: Grout Cleaning Methods
| Method | Effectiveness | Safety for Tiles | Cost | Best For |
|---|---|---|---|---|
| Warm Water | Low | All tiles | Free | Light dirt, regular maintenance |
| Baking Soda Paste | Medium | All tiles | Very low | Moderate stains, safe option |
| Vinegar + Baking Soda | Medium-High | Ceramic/porcelain only | Very low | Stubborn stains on ceramic |
| Hydrogen Peroxide | High | Most tiles | Low | Tough stains, whitening |
| Commercial Cleaners | Very High | Varies by product | Medium | Severe stains, deep cleaning |
Frequently Asked Questions
How often should I clean my grout?
For high-traffic areas like kitchen floors or shower grout, aim for a light cleaning monthly and a deeper clean every 3-4 months. Low-traffic areas can be cleaned less frequently, around every 6 months.
Can I use a magic eraser on grout?
Yes, melamine foam sponges (magic erasers) can work on grout, but use them gently. They’re mildly abrasive and can wear down grout or remove sealant if you scrub too aggressively. They’re best for small touch-ups rather than entire floors.
Why is my grout still dirty after cleaning?
If your grout looks clean when wet but dirty when dry, the discoloration may be permanent staining that has penetrated deep into the porous grout. In this case, you might need to apply a grout colorant or consider regrouting.
Is it safe to mix cleaning products?
Absolutely not. Never mix different cleaning products, especially bleach with ammonia or acids. These combinations can create toxic fumes that are dangerous to breathe. Stick to one cleaning method at a time and rinse thoroughly between different products.
How do I know what type of tile I have?
If you’re unsure, assume you have natural stone and use only pH-neutral cleaners until you can confirm otherwise. Ceramic and porcelain tiles typically have a glazed, uniform appearance, while natural stone shows natural variations and patterns. When in doubt, test in a hidden spot or consult the manufacturer.
Can steam cleaning damage grout?
Steam cleaning is generally safe for sealed grout and ceramic tiles, but avoid it on natural stone, unsealed grout, or damaged grout. The heat and moisture can cause natural stone to crack or loosen poorly adhered tiles.
How long does grout sealer last?
Grout sealer typically lasts 6 months to 2 years depending on the traffic level, exposure to water, and quality of the sealer. Bathroom grout needs resealing more frequently than a backsplash. To test if your grout needs resealing, drop some water on it—if it beads up, you’re good; if it absorbs quickly, it’s time to reseal.
Final Thoughts
Cleaning grout doesn’t have to be a dreaded chore that risks damaging your beautiful tile. With the right approach, tools, and a little patience, you can restore your grout to its former glory while keeping your tiles in perfect condition. Remember to start gentle, test first, and never use harsh chemicals on natural stone. Regular maintenance and proper sealing will make future cleaning sessions much easier.
Your floors and walls work hard for you—give them the care they deserve, and they’ll continue looking beautiful for years to come. Now grab that brush and get scrubbing—you’ve got this!